So if you've wondered if I'd fallen off the face of the earth, you're wrong. I have been devoting all my evenings to Christmas crafts, which I should actually be doing right now, and I've been cooking up a storm. So far Henry and I have made a huge gingerbread house, which I let him eat pretty much all day long. Funny thing is that the candies are so stuck on it that he can hardly chip anything off and it takes him FOREVER to get his favorite candies off. We then made gingerbread ornaments and cookies for eating which we pretty much gave all away. Yesterday I got together with some friends and made candy canes and chocolate dipped pretzels rolled in toasted coconut and other goodies, which we already gave away, and in-between that I've been making ABC quiet books for both Henry and Bea. We've accomplished all this in just about one week.
Can I just tell you about my day yesterday? Well I got up, got ready, did laundry, cleaned the house and made bread by about 10am, then my friend Trixie came over to make candy canes. We both burned our hands and bodies while working with the hot sugar but it was worth it. They are so beautiful and really tasty. Then we had a couple other friends come over and made chocolate covered pretzels and another couple batches of candy canes. During this whole fiasco we had three boys running around screaming and Bea basically just wandered around the house looking for food all day. I don't think Henry had anything but candy canes to eat all day long. So bad. At 5:30 I hopped in the car, picked up one of my Young Women for our activity and we made Christmas baskets for non-members and went around singing Christmas carols, delivering them to neighbors and friends. Each girl made something to put in the basket along with Books of Mormon with testimonies in them and the Joy to the World DVD. They were really beautiful and we had a blast delivering them. After the activity I went to a friend's house to pick up some more canning jars she was getting rid of along with some camping equipment and then I finally arrived home, spend a little time with Justin, cleaned my kitchen, worked on my ABC books until I heard Bea crying around midnight(I think she was starving) so I fed her something and put her to bed. I finally crawled into bed around 1am.
Basically I'm starting to get exhausted....but there's still so much to do! Is it totally wacko that I really love living like this? I felt so fulfilled when I went to bed.
Thursday, December 10, 2009
Wednesday, November 11, 2009
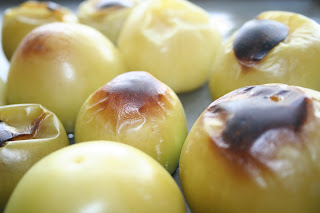
Winter Squash Wonderland


Anyone have any favorite recipes you'd like to share that have winter squash in them? Can't wait to use my new cookbook Justin got me for my Birthday(can't find it on goodreads). These squash were also totally dirty when we got them so Justin painstakingly washed them one by one. We must have hundreds because we ended up with 300 lbs of them. We have Butternut, Buttercup and Acorn which is a pretty great variety and have very different flavors and textures. They can be kept for up to 6 months in a cool, dark, dry place so it looks like squash for dinner every night until about March. Easy, yummy, and healthy.

Saturday, September 26, 2009
Pesto Chango

There's this farm market I go to to get bushels of basil. It's $20 per bushel to be exact which is a steal since the one oz of basil you get at the grocery store costs at least two dollars and then you say to yourself, "I can just buy this basil plant here for four dollars, maybe I should just do that and grow some more", but that plant never has enough for your recipe, so you end up buying two packs of cut basil and it still doesn't even equal the cup you need. If any herb companies are out there reading this, you ALWAYS need more basil in recipes than, say, fresh thyme or rosemary. You can use cups of basil but one tablespoon of rosemary so why are the packages the exact same size? Can those people be more uneducated about the amounts of basil used in recipes?

Table of Basil
Anyway, so my suggestion to you is to find a farmers market that sells basil by the bushel and turn it into a basil and oilve oil puree to freeze for the whole year so you never have to buy that tiny package again. This is the recipe
2 cups packed basil
1/2 cup oilve oil.
Put all ingredients in blender and pulse, push down, and blend until it's as puree'd as your blender can do. Pour into a plastic bag and place in the freezer. I made around 50 bags of pesto base this year. I had about 30 last year and I ran out two months before the basil harvest.
IF you want to make the pesto with the cheese and nuts you may add them in when you serve your dish. I read that you shouldn't really freeze the cheese and nuts for long periods of time so you should add those ingredients in when you're serving the dish. So to your basil paste you add...
1 garlic clove
1/2 cup freshly grated Parmesan cheese
2 Tbs freshy grated Pecorino Romano (optional)
1/4 cup pine nuts or walnuts
Salt and pepper to taste
Throw everything into the blender once more and blend until creamy.
Tip: If you make your own pesto, make sure you wash the leaves well and let them dry before blending them. Also make sure you pick the leaves off the thick stems. The small ones are fine, but large stems don't puree. If your basil is wilted, just soak the leaves in water and put in the fridge in a closed bag overnight and they will crisp back up. This works with any herb.

Friday, September 25, 2009
Colored Vegetables are the Best

When we went with our friends up to Lake Chautauqua I spent a significant amount of time in the kitchen preparing delicious meals. Justin, as usual, hid the camera so we have almost no photos of any of the kids, but I managed to get a few shots of my bowl of tomatoes and wildflowers I picked before he hid it again.

Here are also some shots of my colored beets and carrots to go along with my multi-colored tomatoes. Nothing excites Henry like pulling carrots and not knowing exactly what color will come up. You should try it at home:). And yes I know that tomatoes are a fruit...just in case you were wondering:)


Wednesday, September 23, 2009
Canning Craze
What? No comments on my last post? I know it's only been 24 hours but I hope it at least sparked your interest. I'm actually in the process of ordering bulk coconut oil for me and a bunch of my friends online. We'll probably get like 30 gallons. Anyone want in?

Anyway, I've been busy canning everything from salsa to applesauce to pasta sauce. I have been lucky to have so many friends come to help me in my efforts. Not only does it make things fun, but having an extra couple hands when you have two kids running loose all over the house is really nice, especially when some of those hands are from baby hungry teenagers:) Here's my super darling friend De'Mia. She's a gourmet chef in the making and we've decided to become You Tube stars by doing our own cooking show. Stay tuned:) She helped me make salsa and my dried corn the day she came over.

Here are my two salsa recipes. I am seriously considering planting some tomatillos next year in my tomato garden because they make such thick salsa, way better than any tomato I've used, even roma. They are already limey and thick so you don't have to add much to get the flavor or consistency of great salsa.

Roasted Tomato Salsa
INGREDIENTS
* 12 roma (plum) tomatoes
* 1 small head garlic, unpeeled and cut in half
* 1 onion,
* 1 jalapeno chile pepper
* 1 1/2 tablespoons olive oil
* 1 teaspoon ground cumin
* 1/4 teaspoon salt
* 3 tablespoons fresh lime juice
* 1/4 cup chopped fresh cilantro
DIRECTIONS
1. Preheat the broiler.
2. In a medium baking dish, place roma (plum) tomatoes, garlic (cut side up), onion and jalapeno chile pepper. Drizzle with olive oil.
3. Checking often, broil 5 to 10 minutes, or until outsides of vegetables are charred.
4. Remove vegetables from heat. Remove and discard tomato cores, jalapeno stem and garlic skins.
5. In a food processor, coarsely chop the charred vegetables. Transfer to a medium bowl and mix in cumin, salt, lime juice and cilantro.
You may add as little or as much of each ingredient as you like. I like to add more garlic and more lime juice because I’m just that sort of gal, so add or subtract whatever you like to come up with the best combination. This is best served warm right out of the blender with chips warmed in the oven. Yum!
Salsa Verde (Tomatillo)
4 tablespoons olive oil, divided
2 1/2 pounds tomatillos,* husked, rinsed
4 large fresh poblano chiles,* halved lengthwise, cored, seeded
4 unpeeled garlic cloves
2 cups (packed) coarsely chopped fresh cilantro plus additional for garnish
1 cup (packed) chopped green onions
Preheat broiler. Line large rimmed baking sheet with foil; brush lightly with 1 tablespoon olive oil. Arrange tomatillos, poblano chiles, cut side down, and garlic cloves on prepared baking sheet. Broil until tomatillos and chiles begin to soften and blacken in several spots, watching closely to prevent burning, about 10 minutes (do not turn). Remove from oven. Let stand until cool enough to handle, about 15 minutes.
Transfer tomatillos to processor. Peel garlic and add to processor. Peel charred parts of chiles; coarsely chop chiles. Add generous 1/3 cup chopped chiles to processor (reserve remaining chiles for enchilada filling). Add 2 cups cilantro and 1 cup green onions to processor; using on/off turns, blend until coarse puree forms. Season salsa verde to taste with salt and pepper.
Tuesday, September 22, 2009
The amazing truth about coconut oil -- please read for your future health!
 The Coconut Oil Miracle by Bruce Fife
My rating: 5 of 5 stars
This book is to the body as the Book of Mormon is to the soul. It's so horrible to know that our own government allowed the soybean industry to tell us that coconut oil is bad for your health for financial gain, however it's so great to know that all the horrible effects of the free radicals and harm they have already caused in everyone's body can be reversed and your body can be healed by adding coconut oil and coconut products to your daily routine -- and with no calorie restrictions or limitations! This is a must read. Everyone needs to be using coconut oil almost exclusively to cook and bake with. The best part is it's so delicious! Thank you God for creating this wonderful fruit/nut/vegetable miracle!
View all my reviews >>
Monday, September 21, 2009
The Big Corn Harvest


Put 16 cups of corn and milk from the cobs(you scrape the cobs after you cut the kernals off to get the milk) into a large saucepan with a half cup of cream, 6 Tbs of sugar and 4 Tbs of salt. cook on high, sturing constantly for 20 minutes. Pour mixture onto cookie sheets one layer thick and put into oven and slowly bake to dry. I increased the heat to dry it faster and mine got roasted a little bit, which I think will taste fabulous when served. After it's looking really dried, transfer the corn to paper lunch sacks and let hang in the driest room in the house until the corn shakes freely in the bag. Pour into glass jars and keep tightly closed. Serve by heating corn up with some milk on the stove. I am going to make a corn soup or chowder with it.

Sunday, August 30, 2009
What the Gourd?


Sunday, August 23, 2009
More Garden Delicacies
I've been busy canning, traveling, cooking, planning Birthday parties, and I have no time to write about all the yummy things we have been eating. Most have been fresh from the garden. Here are some photos of the foods we have grown this year in our garden. Nothing I grow is of the ordinary variety. Check these out...

This is a box of tomatoes I picked to bring to our family reunion. So beautiful.

This is the chocolate stripes tomato. Are your taste buds going wild with jealousy?

Bea examining the colored carrots we picked from the garden. They are yellow, white, pink and red. So wild!

Blanched peaches
The jam, if you're wondering, is all peach jam but I've made raspberry, blueberry and cherry as well this year. I have a new recipe that it working great so far that is as follows...

Buy a box of Ball no sugar pectin and follow the instructions for your desired fruit
Add ONE cup of sugar and one teaspoon of stevia as the sweeteners.
That's it. I did absolutely no sugar jam last year and the jam started to brown and it just was not appetizing so I decided to use a fraction of the sugar in regular jam (which was up to 7 cups for the sour cherry in some recipes) and just used one cup plus the stevia. It preserves the fruit longer, makes it look better and gives it just that tinge of sweetness so it doesn't taste like you're just eating cooked berries or fruit. I'm quite happy with this recipe and I feel fine eating it and feeding it to my family. We treat it like a dessert so I think it's worthy.
Saturday, July 25, 2009
First Tomatoes

Henry and I picked the first ripe yellow pear tomato yesterday and a couple of tiny spoon tomatoes that were also ripe. I can only tell you that they were DIVINE! The one sad thing is that our pineapple heirloom tomatoes are all suffering from bottom end rot. I really dislike the weather here that causes this sickness. It's like rain for three weeks and then dry for three weeks, on and off, all summer. That is NOT good for tomato plants.

This plant has probably a few thousand flowers on it. I don't know how it will support all the tomatoes but I hope they all survive.

Here are the tomatoes at the bottom ready to ripen. We should get an excellent crop from just this one plant. I believe this is the Isis Candy Cherry plant. We'll see:)

These are from the spoon tomato plant. You can't really tell but these tomatoes are about as big as peas and that's as big as they get. We ate some that were almost ripe courtesy of Henry and they were pretty acidic. I hope they get sweeter when they're fully ripe. There are also tons of tomatoes on this plant, which is my largest one of all.

These are the green pineapple heirloom tomatoes. I LOVE how gnarly the bottoms of these tomatoes are and check out the coloring! When ripe they will be yellow with green stripes. I wonder why my other pineapple heirlooms got rot and these didn't. I might have to order new seeds next year instead of propagate my own to get rid of any disease.
Thursday, July 23, 2009
Crepe Mountain

I had a few dozen left over eggs that might have gone bad so I decided to make a giant stack of crepes and freeze them since I read they freeze really well. It took me the better part of the day but we've been enjoying them so much. I ground my own whole wheat pastry flower for the crepes which makes them just as light and fluffy as the white flour ones and we fill them with fresh berries, whipping cream and real maple syrup. We also make cheese crepes and pizza crepes. Any of you have any other good savory crepe filling recipes?

End of Berry Season
I have been picking berries for the past month and now my 9 cubic foot freezer is almost completely filled with nothing but berries. We're about half way done with our winter stocking. I still need to go pepper picking, get peaches to can and freeze, and buy a bushel of basil. I'm really worried though because it's been raining every day and has been cool this whole month and that's not good for most fruit, especially my tomatoes! Most of mine are late season crop plants so I might not get many at all. We'll have to see!

What we do with our berries. We get about a pint every day from our own bushes.

REAL strawberries from the pick-you-own farm. These are delicious and organic too!

I think we bought about 30 lbs total.

This gives you an idea of how big our white raspberries are. They fit on my thumb and my thumb aint small, people.

A mixture of berries. They black are from the farm and the white and red are mine.
Saturday, June 13, 2009
Did I really beat Justin?

Yes, it's true. I beat Justin for once in my life in the Yellow Creek Triathlon. And it was by 5 minutes. I also won third place in my division. Woo hoo! I'm not sure how well I did overall though. Justin and I are planning on doing a couple more of these this summer and maybe some other races. It's hard to find races that aren't on Sundays but we have a couple more in mind. My hair tie broke after the bike portion so that's why my hair looks like a lion's main. haha. So the swim is a half mile, the bike is 9.5 miles and the run is 3.5 miles and I finished it in one hour and 23 minutes and Justin in an hour and 28 minutes. There were Amish children out on their porches watching us go by on our bikes, beautiful farms everywhere, and it wasn't even very hot. The lake was pretty warm, but there was seaweed or lakeweed? tickling our bodies the entire way. Justin was pretty freaked out by it, but I didn't mind so much. Overall it was really fun and I love doing things together! I love you baby, and Happy Birthday!


Sunday, May 31, 2009
Gourmet Rice Cakes

I have a fabulous new friend who is from South Korea and has been here only 3 years now and she made me the most delicious and beautiful rice cakes! I told her they were yummy, but she told me that someday she hoped I would tell her the truth about how I liked them. I'm here to say that I genuinely liked them and wouldn't mind eating more of them someday. I could tell that they had a little sweet soy sauce, chestnuts, a mini date roll and a tiny pine nut flower on each one. One thing I love to eat is beautiful food. In fact, I heard that you can fool people into thinking something is delicious just because it is so beautiful. Not that these were the case, but just something to consider next time you pay $100 per plate at a French restaurant. I love Asian food and those darling little cakes were right up my alley. Thanks Jihye! You made my day:)

Monday, May 25, 2009
Beautiful Vegetables
Someday I'm going to have these framed and put up in my home. Nature's bounty leaves me breathless sometimes...and reaching for my camera:)


Wednesday, May 20, 2009
Pizza at your fingertips!

What you will need...
Pastry flour, yeast, water, salt, olive oil, pizza stone(optional), pizza slip(optional), If not using a pizza stone and slip a cookie sheet will suffice
toppings: fresh mozzarella, basil, San Marzano tomato puree or whatever you like
Combine...
1 Tbsp yeast
2 Cups very warm water
Let activate for 5 minutes
Add 1 Tbsp salt
Turn on your mixer and slowly add about 4 cups pastry flour or "00" (as defined by the Italians) flour you can get at your local Italian market. It's the most finely ground flour you can get and can be expensive. You can grind it yourself though if you have your own grinder like I do, but then you get whole wheat pizza and you might not want it. If you use regular flour, your dough will not be soft and squishy after it's baked. It will be hard so you should just get the good stuff. Add more or less flour until you reach the desired consistency.

Okay, so then when your dough looks like it's coming together slightly in your bowl,not to runny, but not in a solid looking ball, let it mix for about 20 minutes on the lowest setting on your mixer. The dough should still be somewhat sticky to the touch, but not runny.
Put your pizza stone in the oven and turn it on at the highest setting, usually 550 degrees.
Take it out of the bowl and pour it onto a well floured surface and sprinkle with flour. You are going to be making the ball of dough which is an art in itself and key to making sure the dough doesn't get holes in it when you stretch it out. Start dividing the dough into pieces that are about as big as a clementine, or as big as a tennis ball for a larger pizza. Add just enough flour so your hands don't stick to the dough. The trick is to add as little flour as you can get away with. Start rolling the dough on the sides into the middle and then squeeze it together while you're stuffing it through your thumb and first finger(making a circle) and pinch it off to form a perfect ball with no creases. Put it on a cookie sheet with flour sprinkled on top and make as many as you can.

You may freeze the dough at this point and use some of it at a later date. This recipe makes about 10 personal pizzas.
You don't need to let the dough rise and you may use it right away if you want to. I make all the balls first and so they rise a little bit before I use them.
When you are ready roll it out, you take the dough, use the pads of your fingers to flatten it as much as you can and then start pulling at the edges and try any technique you want to stretch it out without creating a hole. You can look this up online and get better instructions than I can detail.

When your dough is pulled out to the desired size, put your pizza on a lightly floured surface or right on the pizza peel that you use to slide it onto your stone. I like to sprinkle the peel with coarse cornmeal for an easy transfer. QUICKLY add toppings to your pizza. We usually only use...


Coarsely pureed San Marzano tomatoes (Can get a giant can at Costco and freeze in individual packs for later use)
Fresh Mozzarella in chunks
Fresh Basil or pureed basil with olive oil (for winter months when basil is expensive)
Salt and a little olive oil drizzle at the end if desired

Right when you are done putting the toppings on, transfer the pizza to your pizza stone by gently shaking it to get it to glide off the peel onto the stone. If it sticks, don't shake it hard because if your toppings fall off onto the stone they will burn and set of the fire alarm. If your pizza gets a hole in it, it's ruined, so make it into a calzone or pizza roll. Also, don't load up your pizza too much. The toppings aren't finished cooking by the time the crust is done and it is really hard to slide off the slip.
Bake your pizza for about 5 minutes, until the edges turn golden brown. Your pizzas will cook better if you let the stone warm back up in between pizzas or get two stones like I have and alternate.
Take your pizza out, cut it on a DIFFERENT cutting board, not the slip, and enjoy!
Other yummy pizzas I have created are...
Goat cheese, prosciutto, and pear
Olive oil, salt, and herbs
Roasted pepper puree with roasted vegetables and green chile
Subscribe to:
Posts (Atom)