Sunday, October 27, 2013

Cider Pressing - Bringing the East Coast to the West


Me filling the jugs of cider.  Look at our cute red tractor hayride in the background!


Making apple cider controls our life right now.  I picked so many apples that they are starting to rot in our garage and it's crunch time.  Making apple cider is a tedious process and so far, we've done it 4 times this season and made over 30 gallons.  Justin says he has only one press left in him, but if he wants to drink more than one measly gallon of cider each month this year he better get a better attitude because he wants to drink it every day! 

The cider press, with the jack and cider bucket
Cider making seems to be more of an east coast thing, kind of like maple syrup collection, so we decided to bring that over since I'm pretty sure maple syrup will never be made in Utah.  First, we cut the apples because all of them come from untreated trees and many of them have worms nestling in the cores.  We chop them open to cut out worms and organize them into apple type so we can formulate our cider better. 

Justin shoving apples down the garbage disposal
Then we take what we want to use and throw them into the most awesome food grinder ever, which is a white plastic tub with a new, never been used for anything else, totally clean garbage disposal, which crushes the apples up and poops them out into a giant pot(sorry for the illusion, but that's exactly what it looks like) which is where the apples get oxidized and turn brown. 

Close-up of the cider flowing out of the hole in the base of the drum.  You can see it pooling off to the right.
Then they get poured into a fine mesh fabric and wrapped up in our cider press.  After a mesh bag is filled, we throw a pressing plate on top and repeat the process until the drum of the press is full, usually about 3 bags.  Then the top plate is set on the top and the hydraulic jack is inserted at the top, secured and as soon as the pumping begins, the cider starts to flow.  We mix it a little, filter out any small pieces that get through and put it into plastic jugs to freeze for the winter.  It really is the most delicious drink.  
Pouring the cider into the jugs.  I'm sure the water down the cider you buy at the store because ours is so rich and tasty compared to others I've tasted.  We treat it like liquid gold.  Yum!

Monday, October 21, 2013

Honey Caramel Apples


I found this recipe and the caramel flavor was excellent but didn't firm up enough to really make good caramel apples out of them.  If anyone tries it, let me know how it turns out for you.  Maybe cook it for longer and see what happens? I used two types of very small apples, one being a crab apple.  I don't think many people really loved the flavor but I'm just sick of the same old thing, so I did something different. I like new things.

  • 6 medium apples (or substitute 8 small apples)
  • 1 cup honey
  • 3/4 cup heavy cream
  • 2 tablespoons butter
  • 1/4 teaspoon unrefined sea salt
  • natural red food dye (optional)
  • 1/2 cup crushed pecans (preferably soaked and dried)
  • 6 sticks or wooden dowels

Instructions

  1. Whisk honey, cream, butter and salt in a heavy-bottomed saucepan over medium-high heat until it begins to bubble, then immediately reduce the heat to medium. Stir in food coloring, adjusting the volume to match the intensity of color you like. 
  2. Continue to whisk the caramel frequently to prevent scorching and to prevent it from bubbling up and out of of your saucepan. Continue to cook until the caramel reaches a temperature of 260 F (about 25 minutes). The caramel should be a rich brown or red-brown if you also used food coloring; the bubbles should be small and should uniformly cover the surface of the pan and the caramel should be thickened.
  3. Prepare an ice bath. Then pour the hot caramel into a mixing bowl and place the bowl in the ice bath, taking care not to splash water into the hot caramel. Stir the caramel until it is uniformly cooled and it begins to thicken just a bit. 
  4. Plunge a wooden stick or dowel into the core of your apples and roll them, one by one, in the caramel until uniformly coated. Roll them in chopped pecans and place them on a piece of parchment paper to cool completely before serving.


Thursday, September 26, 2013

Yummy Home Made Ketchup


Yesterday I threw a bunch of tomatoes in my sauce maker, boiled down the perfectly smooth sauce to make paste, added some spices and honey and voila, ketchup!  There are some really complicated recipes out there, but I found a quick one that doesn't have weird stuff like cloves in it from Whole New Mom. I did my own little spin on it using honey, omitting the molasses, and using fresh onion and garlic(because I didn't have the granulated stuff).  You can add what you like to your tomato paste and adjust it to your liking. I like the spices in this recipe so adjust as you like and stop buying the sugary junk!

http://wholenewmom.com/recipes/easy-homemade-ketchup-sugar-free/

Easy Homemade Ketchup

Makes approximately 1 1/2 cups 
Ingredients
7 oz (approx 3/4 cup) tomato paste (Of course, you can use 6 oz cans and just reduce the other ingredients.)
2 Tablespoons apple cider vinegar
3 Tablespoons sweetener of choice, or to taste.  (I used 2 T Honey and 1/64 tsp stevia. )
1 1/2 teaspoons salt 
1 1/2 teaspoons granulated garlic (if using powder, use 3/4 tsp)
1 1/2 teaspoons granulated onion (if using powder, use 3/4 tsp)
3/8 teaspoon allspice
1 Tablespoon molasses (optional. I used blackstrap. For a low-glycemic option, use yacon syrup.)
1/8 teaspoon cayenne pepper
2/3 cup water (filtered.  See Is Your Water Safe?)
Method
1.  Place all ingredients in a bowl.
2.  Stir to blend completely.
3.  Store in the refrigerator.

Thursday, May 9, 2013

Warm Quinoa Salad


Also no carrots here. I just got a new oven and I'm still trying to figure out all the fancy functions.
Warm Quinoa Salad - by me!

 "Mom, what if someone broke into our house to steal your food because it was so good.  You better be careful". - Henry after eating this salad

Total prep time 20 min
Total cook time 30 min

Serves at least 6 people

Ingredients
2 cups quinoa
Organic or home made vegetable or meat stock
1/2 stick Grass Fed Cultured butter(you have no idea how delicious this is.  Please find and use it)
Carrots
Coconut oil for roasting and sauteeing
Real Salt
Cucumbers
Parsley
1 cup red onion or any other onion:green, yellow, etc
Few cloves of garlic
Chopped tomatoes(I used cherry)
Arugula(for me)
(I also threw in some left over chopped brussels sprouts. Asparagus would also be great)
Note: this photo didn't have the carrots yet.  They were still roasting, but it added twice the bulk
Clementine shoving it into her mouth
 First of all, just assume everything is organic, because it is:) There is almost no need to worry about amounts in this recipe.  You can put as little or as much vegetables as you want in your quinoa and it will work.  Cook quinoa in a rice cooker using stock and a half stick of butter or cook according to instructions on the package.  Just throw it all in. Roast carrots, cut into pieces and covered in coconut oil and salt, in the oven at 400 until nice and brown and soft in the middle. Sautee red onions and when almost done, throw in the garlic.  Cut up tomatoes, parsley, cucumbers and anything else you have lying around.  Good additions would be roasted cauliflower(my personal favorite), roasted zucchini, mozzarella, parmesan cheese, let your mind run wild.  Chop everything up and throw it all together in a bowl and mix.  Serve on top of arugula or by itself and top with parmesan cheese. Salt and pepper to taste.
Vivi finishing off the last bite.

Real Food Style


I've always liked all vegetables, fruit, whole grains, and to some, I might have had a pretty healthy diet.  However, I have also always liked candy, ice cream, chips and cookies and never shied away from eating as much of those as I possibly could.  I am also a very big eater and have always wondered why I wasn't obese because I eat so much food in general.  I'm like a fat person living in a thin body...until now.

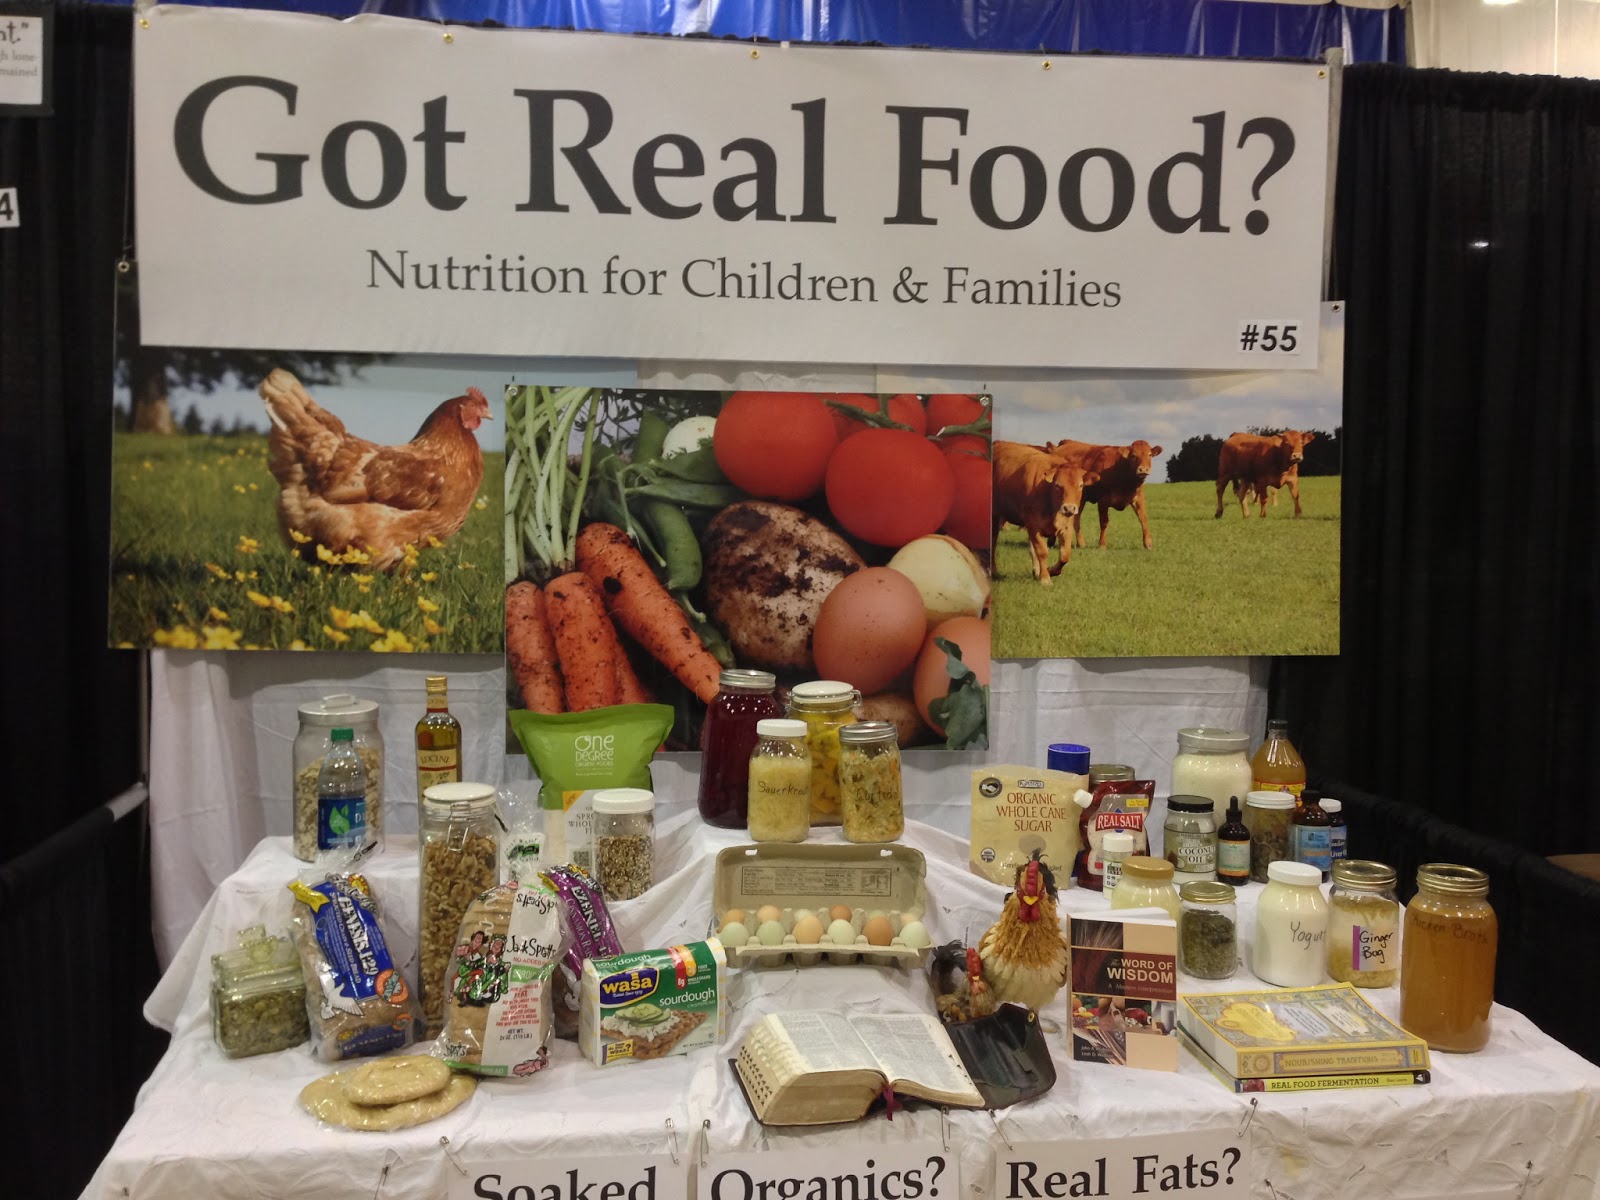
A couple of months ago I was asked to do a BYU Women's Conference sharing station(booth) on Nutrition and I groaned inside myself because I knew what I believed in, which was a more traditional idea of eating food instead of what current trends were telling us about weight loss and cancer prevention.  I knew my conscience wouldn't let me live it down if I didn't present my more extreme, traditional idea of diet to the sisters in the conference.  Well, I enlisted the help of my dear friend Lindsay Killian and she gathered up a bunch of women who were all fully committed to living this lifestyle and they helped me put together the most amazing sharing station and it was a huge success.

Along the way I learned a lot of things that I wasn't aware of and I started implementing them into my life and I've had the most wonderful transformation of will.  I used to live the Body for Life eating plan which allowed me to eat sweets only once a week(which is still a decent way to live if you crave sweets) and all week long I would be craving candy and cakes and I couldn't say no to a cookie at a church function, so I would save it for my "free" day on Sunday.  After reading, pondering, studying out in my mind and praying about it, I have lost my desire to eat junk food and when I think about it, it seems repulsive to me.  I really feel like I've gained a testimony about how the Lord wants me to treat my body and the spirit it helping me to stay away from harmful substances.

I have also been slowly transforming my children's diet and I really hope I can keep it up in the winter.  Luckily produce is available year round because in winter I usually buy tons of snack foods until summer comes around when I let it peter out and we just eat fruit and veggies until Halloween comes around and then we start eating junk again.  I'm fully committed to scheduling time to cook every day(especially because I enjoy it) and feeding my family foods that aren't processed.

The conversation about processed foods is endless, but all I have to say is that manufacturers of processed foods do not have our health in mind and there have been many recent books published, like Salt Sugar Fat that illustrate how the combination of the three has been formulated to addict us and harm our bodies, and it's just not safe to consume processed foods.

The ladies who helped me at my conference created these wonderful documents about nutrition in it's different categories and I will post them one by one in case anyone wants to read them.  Even if you think you're eating a healthy diet...you may be surprised to learn quite a few changes you can make.

From now on, I will only post healthy recipes and thoughts about consuming healthy foods, which seems to me the natural progression of my blog since it's entitled Hohl Foods. 

Wednesday, May 2, 2012

Eataly: NYC

My new favorite place on the planet: Eataly -- Alti Cibi(high class food)
 Justin and I took a trip out to NYC to a wedding and basically we ate ourselves into oblivion.  On Saturday I ate a giant steak then ate a 5 course meal at a wedding until midnight.  I had visions of that movie, "Seven"(back when I watched R rated movies) where that murder kills people who were guilty of committing the 7 mortal sins.  I totally felt like the obese man who was forced to eat until he died.  I ended up curled up in bed with a totally sick stomach, waiting for the food to digest, but I could tell I was headed for upheaval so I didn't waste any more time missing the after party and I just gagged myself so I would feel better.  I don't know if there's anything I hate more than throwing up.  I even broke some blood vessels in my eyelids.  haha.  Hideous.  I ended up putting my make-up back on and joining Justin at the after party for about an hour and felt fine for the rest of the trip.  Normally I could have pounded down all that food easily, but my stomach has shrunken and I just don't have my bottomless pit pregnancy stomach. 

Fresh Italian bread
So, this place, Eataly, is like an indoor replica of an outdoor Italian market place.  The name is so catchy as well because the correct way to pronounce "Italy" or "Italia" is not the frequently mispronounced, "Aye-tal-ee-ya" or even "Iht-a-ly"  It is said just like the word "Eataly" or "EE-tal-ee-ah".  So clever.  Anyway, there are like 10 different counters that sell pizza, pasta, freshly made mozzarella, seafood, bread, cheese, meats, etc.  and the rest of the place is like an Italian grocery store.  It's pure genius and totally delicious.  Justin and I ate two balls of fresh warm mozzarella, incredible prosciutto, olive oil, basil and salt, then we slurped down some raw oysters on ice - delish, and topped it off with a pizza and some wild boar ragu pasta.  There were Italians everywhere and we were speaking in Italian the entire time we were eating and ordering.  It was such an incredible experience and it made me realize how excited I am to go back to Italy this summer! We are taking the kids and Lucy on a month long trip to Italy before Justin starts work.  It's going to be epic!

$5 pasta bags

My favorite pasta of all time: fusili bucati lunghi.  This particular bag was $9...so we left it behind

These are also really fun long straw-like pastas.  I wish I could have bought some!

Authentic Italian deliciousness

Even though these look pretty, don't be fooled by Italian pastries.  Most of them are not worth the money or the calories. 

Thursday, March 8, 2012

Accidental chocolate salted caramel volcano cake


Erupting with sweet, delicious dulce de leche(DDL)

The other day I baked a chocolate cake from scratch with all the best ingredients.  It was for the adults at Henry's Family Birthday dinner.  I followed the instructions exactly, but one thing I did not count on was the cake batter spilling over the sides of the cake pan because our oven is not perfectly level in our rental house! We started smelling smoke and I had no choice but to open the oven to take out the bottom pan of our oven so the smoke wouldn't fill the whole house and make the cake taste like smoke.  

Result: volcano cakes.  

All the cakes had sunken pits in the middles and so I just had to deal with it by shaving off a little on top and pouring an insane amount of caramel on top to fill it in.  Nobody minded at all.  I made one large cake for our whole family and kept the smaller cake for later.  I made home-made dulce de leche and toasted coconut for the filling and toppings.  I also tried to make ganache for the frosting on top, which is almost the simplest recipe in the book and somehow managed to curdle it, wasting about $10 of the best chocolate money can buy!  It was an unusually bad day for baking, but in the end, you can't go wrong with chocolate salted dulce de leche cake! Oh, and be generous with the salt.  The saltier the better!
This was actually the small one.  I didn't want to take a photo of the large one.  I was just too frustrated after the whole ordeal!

Toasted coconut or TC is always delicious with DDL

Recipe for Dulce De Leche

I have to say, there are many shortcuts to making this final product, but none are as good as this.  It's a labor of love, but it's worth the time!
DDL and salt together are my new best friends.  I have a tub of this in my fridge and it calls my name every time I open it. Yum.

Ingredients

  • 1 quart whole milk
  • 12 ounces sugar, approximately 1 1/2 cups
  • 1 vanilla bean, split and seeds scraped
  • 1/2 teaspoon baking soda

Directions

Combine the milk, sugar, vanilla bean and seeds in a large, 4-quart saucepan and place over medium heat. Bring to a simmer, stirring occasionally, until the sugar has dissolved. Once the sugar has dissolved, add the baking soda and stir to combine. Reduce the heat to low and cook uncovered at a bare simmer. Stir occasionally, but do not re-incorporate the foam that appears on the top of the mixture. Continue to cook for 1 hour. Remove the vanilla bean after 1 hour and continue to cook until the mixture is a dark caramel color and has reduced to about 1 cup, approximately 1 1/2 to 2 hours. Strain the mixture through a fine mesh strainer. Store in the refrigerator in a sealed container for up to a month. 

We put Dulce de Leche on vanilla ice cream with toasted coconut on top.  It's to die for!

Sunday, April 24, 2011

Most beautiful eggs ever

Check out the turquoise, deep red and gold colors!
Well, these eggs have already been in a rainy egg hunt but can you see the vibrant colors? They are even better than the first time I did them.  Basically you just need the cheapest basic dye kit, BROWN eggs, and use a quarter cup of vinegar to let the pellets fizzle until they melt and then add enough water to just cover the eggs, about a quarter cup more.  Let the eggs soak for about 5 minutes and you have the most amazing colors I have ever seen.  I almost didn't want to eat them! These are way better than the pastel colors you get from using white eggs.  Try it next time!
These eggs were more solid color looking until they got rained on, but still look so vibrant.

Thursday, February 3, 2011

Turning "Granola"

 Sorry about the bad phone camera photos.  Here is my general mixed up and three granolas made with milk.

First of all, why does my phone capitalize granola when I type it in? Is it a proper noun or something? Well, I have news for all you granola lovers out there...you're missing out if you haven't tasted my lime cardamom granola my friends.  This week I did a granola demonstration for the Relief Society sisters and so this past week I delved into researching all granolas to find the best recipes.  What did I find? A whole lot of nothing the same.  Granola recipes couldn't be more different.  I feel like I tried to search for just "soup" or something and got so many recipes with only a few ingredients in common. 
Here are two jars of chocolate cinnamon and one of almond essence with maple syrup. 

So, this is the skinny on granola...it can be really unhealthy if you make it with processed oil and brown sugar with just a dab of honey like most recipes call for.  Just use coconut oil and only natural sweeteners and you will be well on your way to healthy and delicious eats. 

This is the recipe...

5 cups of dry ingredients, whatever you like (can be all oats or a mixture of oats, seeds, and nuts and coconut)
3/4(scant) cup of oil(or milk)
1 cup or less of sweetner(depending on how sweet you like it)
Mix it all together, spread on two TIN FOILED AND GREASED  cookie sheet at 325 for 8 minutes on the top rack and 8 minutes on the bottom rack and then take out, let cool, add any dried fruit desired and store in a tight container. 

Having a recipe like this can open your mind to experimentation instead of following another's concoction.  As I was making my granola I thought of what spices I could throw into the mix.  Cinnamon, yes! Real almond extract, Oh so yummy! Chocolate powder, yes! Peanut butter(in place of oil), yes! Lime cardamom sauce, double yes! I'm telling you that not one of them turned out bad.  I'm only sad I didn't get a chance to try cranberry juice concentrate to essencify a batch with cranberry flavor.  I think I have about 50 lbs now in my cupboard so I think I'll just send it off to the Missionary Training Center where my sister is learning how to be a missionary for the Fukuoka, Japan mission.  I miss her so much.  Take care little sista and I know you'll enjoy some of this healthy granola so you don't have to eat the biscuits and gravy(death to the body!)

I mostly love this granola because it adds a much faster breakfast to our list of acceptable breakfast foods which is limited to, home made yogurt, french toast, pancakes, eggs, steel cut oats or cracked wheat, all made with whole wheat and all from scratch.  For once I can decide to not cook breakfast in the morning and spend a half hour cleaning up! I know some of you are thinking, what's wrong with cereal? Well, 1. because it fills my kids up for all of 5 minutes and, 2. there's nothing more processed on the face of the planet.  Plus, 3. it's super expensive and most of it is just air.  Anyway, please make up your own granola recipe and tell me how much you love it:)

Sunday, December 26, 2010

Indian wedding extravaganza

Two weekends ago one of my dreams came true and we attended a real Indian wedding at the Drake Hotel in Chicago. It was definitely worth the ling drive for the two day extravagant celebration complete with three meals and entertainment amongst elaborate decor. The food was excellent but extremely spicy and I have never been more grateful for plain yogurt in my entire life. There were some traditional American elements to the wedding like a chocolate chocolate ganache cake that was to die for delicious. That's my kind of wedding.
Published with Blogger-droid v1.6.5

Tuesday, December 21, 2010

Best Gingerbread houses ever

This year I did two gingerbread houses: One for my friend Gulzat(her first ever real gingerbread house) and another for me.  Hers was a traditional one but mine turned out really modern and I think is the best one I have ever made.

Gulzat's house had a chocolate sugar roof complete with Santa's sleigh and reindeer with Santa in the chimney.  She decorated the rest with tiny gingerbread ornaments and a family complete with a sister that her son Daniel is wishing for someday.  She's showing it off to all her friends and getting many compliments:)


I decided to make a taller house this year and I cut out some round windows instead of all square.  I covered it with cinnamon sticks on the sides, black licorice on the back and Hershey's chocolate bars on the front polka-dotted with various candies.  The roof is frosted Mini Wheats with Rudolph on top. It kind of looks like a bank to me.  What do you think? I also stayed up until 2am the night before making a chocolate tree and Santa.  Everyone comments that he looks like a black Santa, but it was either that or albino, so I chose the dark chocolate and I think he's fabulous!

Wednesday, December 15, 2010

New Christmas Treat:Toffee

 My favorite: Dark chocolate on bottom, toffee, white chocolate with sliced almonds and TC

I know it's been a long time.  I've been busy traveling all over the globe and we're still on the run, but here is my favorite new treat over the holidays....toffee.  It's super easy and looks fancy.  This is the recipe you get when you search for "best toffee ever" on Allrecipes.com.  I added a generous tsp vanilla in with the sugar and butter and chocolate on the bottom with a various assortment of nuts along with, what other than, toasted coconut. 
Our three kinds: Milk chocolate with pecans, dark chocolate with ground almonds and the above mentioned.

Ingredients:
2 cups butter
2 cups white sugar
1/4 teaspoon salt
2 cups semisweet chocolate chips
1 cup finely chopped almonds
Directions:
1. In a large heavy bottomed saucepan, combine the butter, sugar and salt. Cook over medium heat, stirring until the butter is melted. Allow to come to a boil, and cook until the mixture becomes a dark amber color, and the temperature has reached 285 degrees F (137 degrees C). Stir occasionally.
2. While the toffee is cooking, cover a large baking sheet with aluminum foil or parchment paper.
3. As soon as the toffee reaches the proper temperature, pour it out onto the prepared baking sheet. Sprinkle the chocolate over the top, and let it set for a minute or two to soften. Spread the chocolate into a thin even layer once it is melted. Sprinkle the nuts over the chocolate, and press in slightly. Putting a plastic bag over your hand will minimize the mess.
4. Place the toffee in the refrigerator to chill until set. Break into pieces, and store in an airtight container.


My sister Lucy with our precious cargo...that we couldn't eat or taste until Sunday, our treat day.  I think we made this on a Monday too, so we waited all week long to try it and it was delicious!

Wednesday, August 25, 2010

Dilly Bean and pickled peppers

I just did my first pickled peppers and dilly beans the other day. I didn't realize how easy it was to pickle things, but I'm not sure how much I really like pickled things.  I have to say I like the sweet pickled stuff more than the dill pickled stuff, but nonetheless I really enjoyed not having to give away the peppers and beans we picked at the farm before we left on our California trip.  Basically this is what you do...

Stuff beans or peppers in a sanitized jar
put in a couple cloves of garlic and some dill
pour in hot a vinegar solution of 2.5 cups vinegar and 2.5 cups water with 1/4 cup salt.  Add 1 cup sugar if desired.
close jar and either process in boiling water or stick in the fridge

That's it. You should try it!

Wednesday, July 7, 2010

Georgie's Cherries

Kids in front of the tree with the pie

Many of you know that when our son died we planted a sour cherry tree in our yard to remember him by.  We planted it in the early early spring and it was not expected to have cherries on it that year but it totally did.  We had enough cherries to make one pie for the previous two years and now this year our sour cherry tree produced enough cherries for TWO cherry pies.  We made this one and have quite a few more frozen in our freezer for one more.  Henry also enjoyed picking many of them and sharing them with his friends.  I think we may have had enough for three pies but the bugs, birds, and babies got to them first!
Close up of pie in my new bakeware pan.  Thanks Gammie!

We love everything about our sour cherry tree...the million blossoms in the spring, watching the little cherries ripen and seeing all the red cherries plump up.  They are very tart to eat right off the tree, but it reminds us of Georgie and the pain we still feel with his absence, but then we whip them up into a delicious pie and it turns into our most favorite desert.  I am grateful for his presence in our lives and we think of him daily and we will always remember him every time we see a sour cherry tree and are reminded of how sweet our reunion will be when we taste our delicious pie. 

The pie in front of the tree.  See all the cherries left over?

Bea snacking on the cherries on the lower branches.

Thought this was a cute shot.  We love our cherry tree.


Friday, June 25, 2010

Favorite new treat...Kale?

Yes, I said it.  Kale is my favorite new treat.  I have been getting all sorts of strange things in my CSA(community supported agriculture) box that I have had to find new recipes for and I was really afraid I wouldn't find a good recipe for my giant bunch of kale.  I looked up a recipe online and this one got four stars and I totally agree.  My kids were eating these and Bea was asking for "mo' mo' mo'!"

Kale Chips

Cut the stems out of the kale and cut the leafy part up into bite sized pieces,
Lightly coat the kale in olive oil and spread them out on a few cookie sheets.  Don't pile too much on one sheet.
Sprinkle with seasoned salt or any herb/salt mixture you like.
Bake in an oven at 350 for ten to fifteen minutes until crispy but not burned.  Watch them carefully!
Enjoy! And you will.  I promise.

Sunday, June 13, 2010

How do I have time for this?


I'm already trying to get back into the things I did before having Clementine.  I enjoy doing just about anything crafty or sporty.  I still have three weeks before I can hit the treadmill and work myself into the ground to get in shape.  Until then I'll stick with crafting.  This is the latest thing inspired by some really cute barrettes that were sent to me by my friend Sarah.  It only took about an hour to make all these. 

Basically I got a bunch of different colors of felt, buttons, and little flippy clips, sewed them together(you can hot glue them together if you want) and then glue the clip on and they're done.  You can get pretty creative. 

Friday, May 28, 2010

Arugula Rocket


Justin is obsessed with Arugula.  I grew a bunch in planter boxes this year and it is doing great.  We have been eating bruschetta (officially pronounced bru-SKET-ta in case you were wondering) any time we can.  Justin toasts the bread either in the toaster or over the grill, then we lightly rub a clove of garlic over one side, drizzle with olive oil, sprinkle with kosher salt and then add toppings.  Our favorite is parmigiano cheese and arugula on top.  Sounds really simple but it's pretty incredible, especially if you get good bread. 

Friday, May 21, 2010

Bum Bananas

How could I be so bad at updating this blog? So sorry people. 

So we've had some banana drama and I wanted to ask you all if you've ever experienced this.....I bought a bunch of very green bananas two weeks ago.  Usually they ripen in a few days and occasionally they stay green but get brown spots and they're still ripe but just look green.  This time, however, the bananas never ripened.  I had them for almost two weeks and before I threw what was left of them into the garbage, I tried to open it and it was just like the first day, hard as a rock and unpeelable.  Henry was crying for bananas for two weeks and every day I assured him that they would be ripe soon and they NEVER matured one bit.  I wish I had the patience to just let them sit to see if they would ripen over a month or two, but with the impending baby I couldn't waste the time.  Has this ever happened to any of you?

So, then I went to the store for more bananas and what do you know, they're all over ripe.  I finally found a decent bunch of bananas that had a tiny bit of green left on the stem and would have to be eaten in two days or less but I thought we would all devour them quickly since we'd been depriving ourselves.  While I was at ALDI (our favorite discount grocery store that makes you pay for a cart and bags, or bring your own) Henry had to go poop, Bea had a meltdown and Henry was picking hot peppers off the plants for sale and trying to feed them to Bea.  During the fiasco I forgot to buy bags and I didn't have any in the car.I decided that I could get home without bags so I loaded everything, loose, in the back of my car and drove home, hearing the watermelons rolling around and back and forth with every turn.  I guess I wasn't careful with where I put the bananas because the two watermelons found their way to where the bananas were and slightly squished them, but not enough for me to notice until yesterday when I went to finally eat a nice ripe banana and it was like a banana peel filled with baby food.  Not one of them was acceptable to eat.  Justin later told me that he tried to peel one and it just fell over limp.

So we went from the most rock solid bananas to complete mush.  How could it be so hard to get a decent banana and how else do I eat all my nutella? Please, let me find good bananas tomorrow at Costco.

Tuesday, April 6, 2010

Cherry Pie with leaves crust

Henry and I had a blast making this real sour cherry pie.  I just realized that I only have two frozen packs of cherries left to make pies out of:(  Good thing cherry season is right around the corner!  This cherry pie is my usual recipe from Bon Appetit with a full Meyer lemon zest in it along with Meyer lemon juice.  The flavor was incredible and this pie turned out better than usual with no super runny middle.  My crust did get a little drowned in overflow from the sides but the good thing about a pie is that it never has to look good to taste good! I used some stamps that Justin got for me at William's Sonoma to make all the leaves.  I just love the effect.  I think I'll make one for this weekend for my friend Christi when she comes up to visit.